I am trying to restore a 1947 Rover 12 that until recently was in regular use, but has now got to the point where quite a lot of work needs to be done. I was given 2 starting handles, one long and one short. When checking which one was right I realised that I could use neither as the front bumper bar was too high. It appears that it has been bolted to the cross member immediately behind it, using the cylinders at each end, with a bolt right through from the top of each cylinder. I may be wrong but I thought that those cylinders were supposed to have weights in them to reduce "vibration", not for securing the bumper. The RSR Workshop manual and Part catalogue are silent on this, so I am trying to find out a) how the bumper should be attached to the chassis b) what weights should be in the cylinders.
There are no other P2 Saloons in our local Club, and only three that are in the South Island, and they are all too far away for me to see easily. Any photos or advise would be most welcome.
Front bumper bar & fixings

Re: Front bumper bar & fixings
I hope this can help you http://wp.me/pXLKy-at (type 1) and this http://wp.me/pXLKy-ME (type 2)
and also this
and also this
Re: Front bumper bar & fixings
There are actually 3 types of bumper that may be fitted to 1947 cars. The stabilising type was commonly fitted pre war and has damping weights in the large scrolls at the end, arranged around the bolt that also passes through the 2 horizontal blades. These bumpers fit to the car by means of U bolts around a metalastic bearing bolted to each front dumb iron. The U bolts go through holes in the horizontal blade. There are chrome trims to hide the bearings. The only large holes in the bumper are 2 to hold the starting handle bearing plate.
You can see an excellent restored example at ebay UK item number 131904174286
The second and third types use brackets that are bolted to the dumb irons and the bumpers. Both therefore have 2 additional holes in the blade near the scrolls, and are the type Luli illustrates.
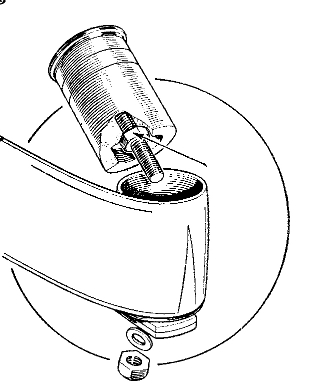
Group 2 bumpers have small scrolls and polished end plugs. Group 3. that are more common, have a large scroll, polished stainless steel mushroom for the ends held on by a slim stud through a dished washer underneath. If dismantling these, you may wish to use a nut splitter. I didn't and it caused a whole lot of extra work repairing a stud!
Group 2 and 3 bumpers are bolted to the car using the same brackets (brackets are handed and 4 cylinder brackets differ from 6 cylinder brackets).
I will check the weights and advise.
Hope this helps
Mike
You can see an excellent restored example at ebay UK item number 131904174286
The second and third types use brackets that are bolted to the dumb irons and the bumpers. Both therefore have 2 additional holes in the blade near the scrolls, and are the type Luli illustrates.
Group 2 bumpers have small scrolls and polished end plugs. Group 3. that are more common, have a large scroll, polished stainless steel mushroom for the ends held on by a slim stud through a dished washer underneath. If dismantling these, you may wish to use a nut splitter. I didn't and it caused a whole lot of extra work repairing a stud!
Group 2 and 3 bumpers are bolted to the car using the same brackets (brackets are handed and 4 cylinder brackets differ from 6 cylinder brackets).
I will check the weights and advise.
Hope this helps
Mike
Re: Front bumper bar & fixings
Just a further thought, The starting handle bearing plate (attaches to the bumper by 2 bolts at the centre, ) can be adjusted vertically as there are usually 2 sets of slots in it.
regards
Mike
regards
Mike
Re: Front bumper bar & fixings
The weight of the assembly, including mushroom and retaining washer fitted at the bottom is 2.020 Kg at either end. Some adjustment is allowed for as the weight is made up from 6 or 7 lead discs.
Hope this helps
Mike
Hope this helps
Mike